Category Archives: Hand tools

The Best Combination Square for Woodworking: A Comprehensive Guide

A combination square is an indispensable tool for woodworkers of all levels of experience. However, with so many different models and brands on the market, it can be difficult to determine which one is right for you. In this article, we will take a comprehensive look at some of the best combination squares available, and help you decide which one is right for your needs. Whether you are a beginner or a seasoned pro, there is sure to be a model that fits your needs!

History of the combination square

The combination square has its origins in ancient Egypt, where it was used for measuring pyramids and other structures. The tool eventually made its way to Greece and Rome, where it was used by carpenters and stonemasons. In the Middle Ages, the combination square was introduced to Europe, where it became an essential tool for builders and craftsmen.

Today, the combination square is used by woodworkers of all levels of experience and is an indispensable tool for any workshop.

Parts of the combination square

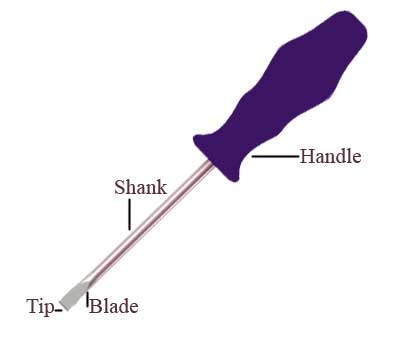
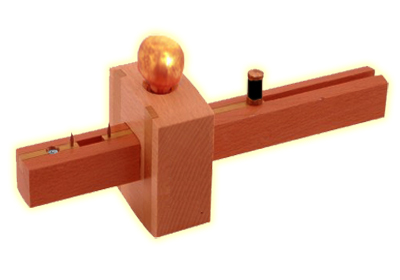
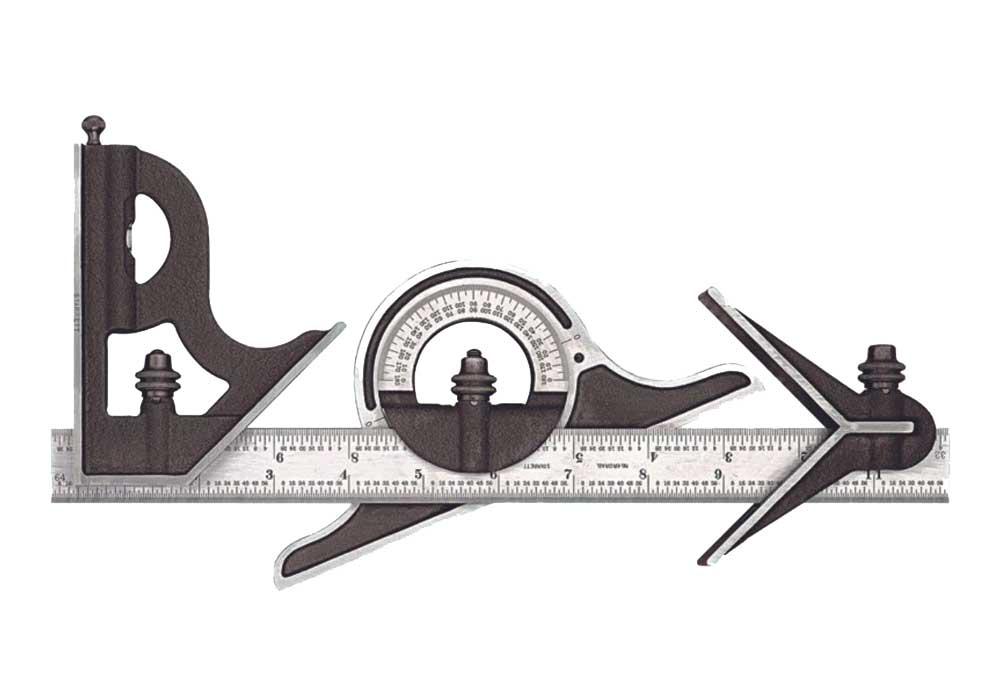
The combination square has three main parts: the head, the blade, and the stock.

The head is the part of the square that contains the rulers or measuring scales. The most common types of heads are those with one straight edge and one ruler, and those with two rulers at 90-degree angles to each other.

The blade is the part of the square that is attached to the head. It is usually made of steel or aluminum, and it is what you use to make your measurements.

The stock is the part of the square that attaches the blade to the head. It is usually made of wood or plastic, and it provides a sturdy base for the blade.

There are also a few other parts that are often found on combination squares, such as a level bubble and a scribe. The level bubble is used to ensure that your square is level, while the scribe can be used to mark lines on your workpiece.

Types of the combination square

There are several types of combination squares available on the market, each with its own advantages and disadvantages. Here is a quick overview of the most popular types:

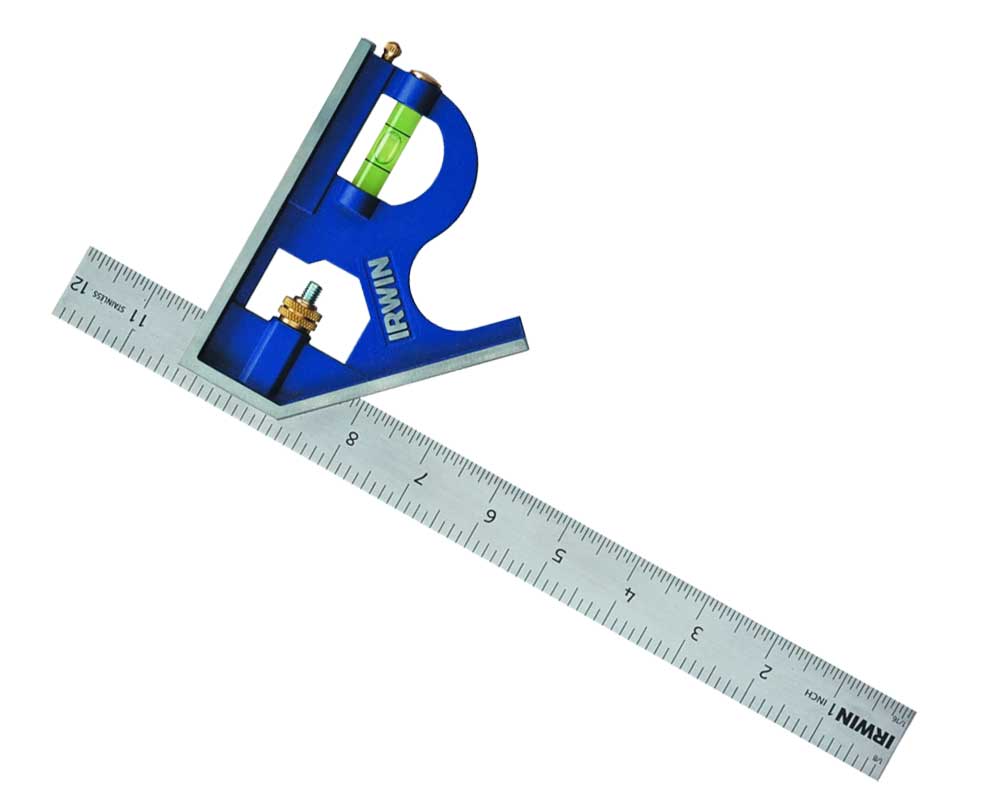
-Traditional combination square: This type of square is the most basic and simple to use. It consists of a steel ruler with a 90-degree angle at one end, and a head that can be attached at either end of the ruler. This type of square is great for simple tasks such as measuring and marking 90-degree angles, but it is not very precise.

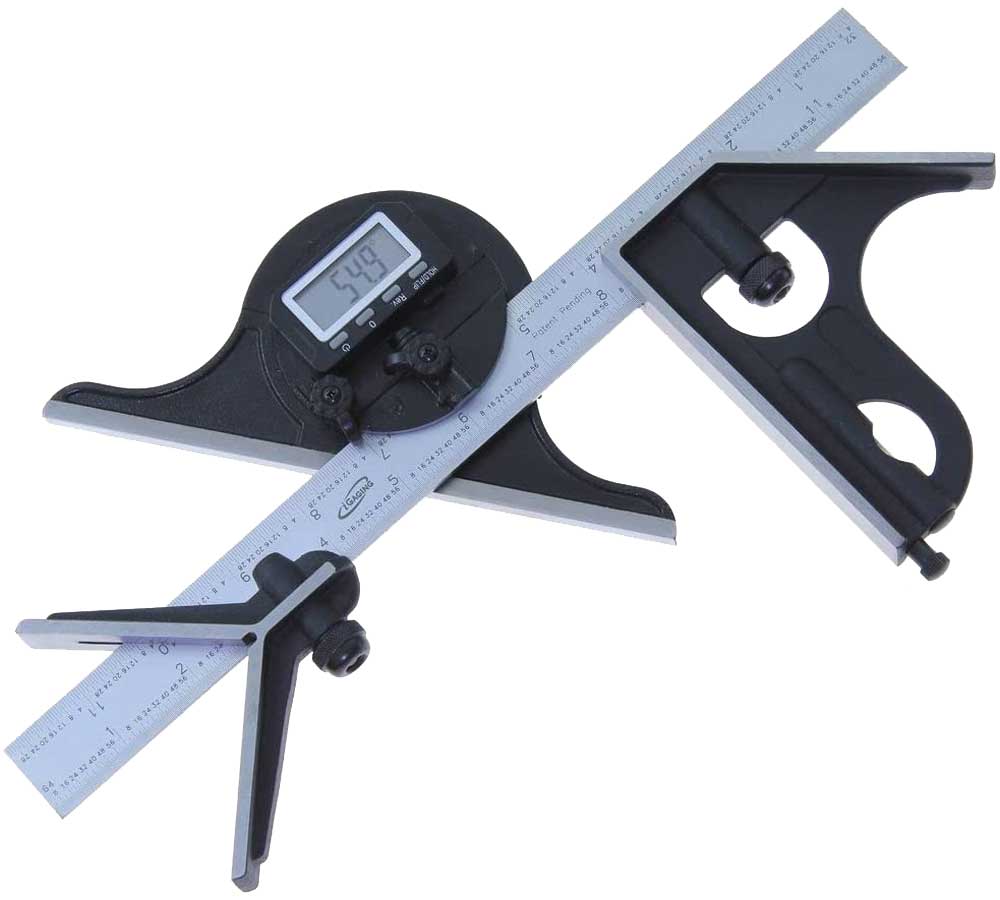
-Digital combination square: This type of square is more expensive than a traditional one, but it is much more precise. It consists of a digital display that shows the measurements, and a head that can be attached at either end of the ruler. This type of square is great for more precise tasks such as measuring small angles and marking very precise lines.

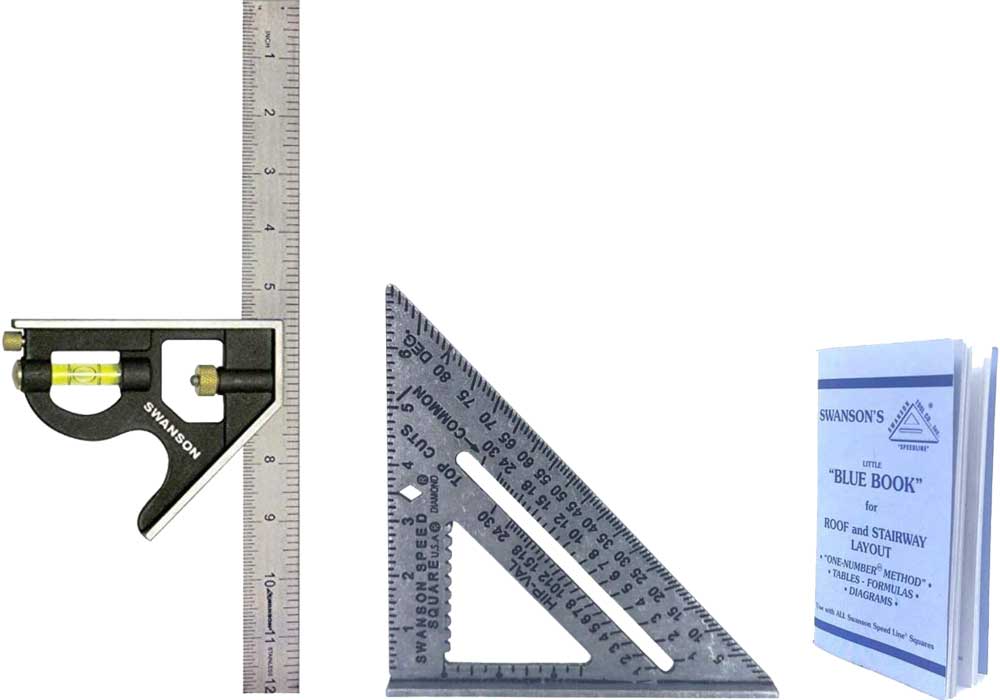
-Folding combination square: This type of square is similar to a traditional one, but it has a folding head that allows for more versatility. It is great for tasks such as measuring inside and outside corners, and marking lines at any angle.

Now that you know the different types of combination squares available, you can decide which one is right for your needs. If you are just starting out in woodworking, a traditional square will suffice. However, if you need more precision, a digital or folding square would be a better choice. Whichever type you choose, make sure to get one that is made from high-quality materials and is durable. With the right combination square, you will be able to tackle any woodworking project with ease!

Combination square uses

There are a few different ways that you can use a combination square:

-marking out lines: you can use the head of the combination square to mark out lines on your wood. This is useful for marking out cutting lines, or for drawing lines that you need to follow when shaping your wood.

-measuring angles: the combination square can also be used to measure angles. This is useful for ensuring that your cuts are at the correct angle, or for checking the angle of existing joints.

-checking for square: finally, you can use the combination square to check whether two pieces of wood are perfectly square. This is essential for ensuring that your project will be stable and look good.

Choosing a combination square

With so many different models and brands on the market, it can be difficult to determine which one is right for you. One of the most important things to consider when choosing a combination square is the blade. The blade is the part of the tool that actually makes contact with your workpiece, so it is important to choose one that is made from high-quality materials. Look for a blade that is made from stainless steel or another durable material. Additionally, make sure that the blade is properly hardened and tempered, as this will help ensure a long lifespan.

Another thing to consider is the handle. The handle is what you will grip when using the tool, so it is important to choose one that is comfortable for you. Some handles are made from wood, while others are made from plastic or metal. Consider how the tool will feel in your hand, and choose a model with a handle that is comfortable for you.

Finally, consider the price. Combination squares are available at a wide range of prices, so it is important to find one that fits your budget. However, remember that the quality of the tool is more important than the price. If you are only going to use the tool occasionally, you may not need to spend as much as someone who is going to use it on a daily basis. However, if you plan on using the tool frequently, it is worth investing in a higher-quality model.

Conclusion

No matter what your needs are, there is sure to be a combination square that is right for you. With so many different models available, it is easy to find one that fits your budget and your needs. By considering the factors discussed above, you can be sure to find the perfect model for your woodworking shop! Have you ever used a combination square? What are your thoughts on them? Let us know in the comments below!

Wood Chisel vs Cold Chisel: Which One is Right For You?

When it comes to woodworking, there are a few different tools that you will need in your arsenal. One of the most important is the chisel. Chisels come in a variety of shapes and sizes, but two of the most common types are the wood chisel and the cold chisel. So, which one is right for you? In this article, we will compare the two types of chisels and help you decide which one is best for your needs.

Wood Chisel vs Cold Chisel

What is a wood chisel?

A wood chisel is a tool that is used to carve or cut wood. It has a sharp, metal blade that is set at an angle to the handle. This allows you to apply pressure to the chisel and create precise cuts in the wood. Wood chisels are available in a variety of sizes, so you can choose one that is best suited for the project you are working on.

One of the benefits of using a wood chisel is that it is less likely to damage the wood than a power tool. This makes it ideal for delicate projects or for working with expensive wood. However, the downside is that it can be more difficult to control than a power tool.

There are a few things to keep in mind when using a wood chisel:

  • Always sharpen the blade before use. A dull chisel will be more difficult to control and can damage the wood.
  • Apply even pressure when using the chisel. If you apply too much pressure, the blade may slip and damage the wood.
  • Be careful not to overcut. This can cause the wood to split or crack.

Now that you know a little bit more about wood chisels, let’s take a look at cold chisels.

What is a cold chisel?

A cold chisel is a steel tool with a sharp, hardened edge that’s used for metalworking. The name “cold chisel” comes from the fact that it’s used to cut metal that’s cold, as opposed to hot metal. Cold chisels are available in a variety of sizes and shapes, and they’re used for a variety of tasks, from cutting metal to shaping it.

There are two main types of cold chisels:

  • Standard cold chisels: These are the most common type of cold chisels. They have a rectangular cross-section and a blunt end. The rectangular cross-section gives them more strength, making them ideal for cutting through tougher metals.
  • Parallel cold chisels: These have parallel sides and a pointed end. They’re narrower than standard cold chisels, making them better for cutting narrower grooves.

cold chisels are made from a variety of materials, but the most common type is carbon steel. Carbon steel is a strong and durable material that can stand up to a lot of wear and tear. However, it is susceptible to rusting, so it’s important to keep your cold chisel clean and dry.

If you’re looking for a cold chisel that’s more resistant to rust, you might want to consider one made from stainless steel. Stainless steel is a more expensive option, but it’s worth the investment if you’re concerned about rust.

There are a few things to keep in mind when using a cold chisel:

  • Wear gloves: Cold chisels are sharp and can cause cuts. Wear gloves to protect your hands.
  • Use a hammer: Cold chisels are designed to be used with a hammer. Don’t try to use them without one.
  • Apply pressure evenly: When you’re using a cold chisel, apply pressure evenly to avoid chipping the metal.
  • Go slowly: Cold chisels can remove a lot of material quickly, so go slowly and be careful.

6 differences between Wood Chisel and Cold Chisel

Firstly, the wood chisel is the most common type of chisel which is usually used for softer woods, such as pine or cedar. The blade of a wood chisel is usually beveled on one side, which allows you to create clean, precise cuts.

On the other hand, the cold chisel is designed for tougher materials, such as concrete or stone. The blade of a cold chisel is usually flat, which makes it ideal for breaking up hard surfaces.

Secondly, the wood chisel is better for working with small, delicate pieces while the cold chisel is ideal for larger projects.

Thirdly, the wood chisel is less likely to cause damage to the workpiece but the cold chisel can handle tougher materials and is less likely to damage the workpiece.

Fourthly, the wood chisel is typically used for softer woods while the cold chisel is designed for tougher materials.

Fifthly, the blade of a wood chisel is usually beveled on one side while the blade of a cold chisel is usually flat.

Finally, no matter which type of chisel you choose, be sure to use it safely and always wear protective gear when working with any type of tool. Happy woodworking!

Conclusion

In conclusion, it really depends on the project you are working on as to which type of chisel is right for you. If you are working with softwoods, small, delicate pieces, then a wood chisel is the way to go. However, if you are working with tougher materials or a larger project, then a cold chisel is the better choice. No matter which type of chisel you choose, be sure to use it safely and always wear protective gear when working with any type of tool. Happy woodworking!

Dead Blow Hammer vs Rubber Mallet: Which Is the Right Tool for You?

If you’re looking for a powerful tool to help you drive nails into hard surfaces, you may be wondering if a dead blow hammer or rubber mallet is the right choice for you. In this article, we will compare and contrast these two tools, so that you can make an informed decision about which one is best for your needs. Both of these tools have their own unique benefits, so read on to learn more!

dead blow hammer vs rubber mallet

Basis on weight

A dead blow hammer is a type of hammer that uses a weighted head to deliver powerful blows. The weight of the head helps to drive nails into hard surfaces with ease. The downside of using a dead blow hammer is that the weight of the head can make it difficult to control, and you may end up damaging your work surface if you’re not careful.

A rubber mallet, on the other hand, is a softer and more lightweight option. The soft head of the rubber mallet helps to prevent damage to your work surface, but it may not be as effective at driving nails into hard surfaces. If you’re working with delicate materials, or if you’re worried about damaging your work surface, a rubber mallet may be the better choice for you.

Do rubber mallets bounce?

One of the key differences between a dead blow hammer and a rubber mallet is that rubber mallets bounce. This can be advantageous if you’re trying to avoid damaging the surface you’re working on, but it also means that you have less control over the tool.

With a dead blow hammer, on the other hand, there is no risk of the tool bouncing off the surface. This gives you more control and allows you to apply more force if necessary.

If you’re planning on using a rubber mallet for your next project, it’s important to choose the right size and weight for the job. A heavier rubber mallet will deliver more force, making it ideal for driving nails into hard surfaces. However, a lighter rubber mallet is easier to control and is less likely to cause damage to your work surface.

So, which is the right tool for you? It depends on your needs. Whichever tool you choose, make sure to use it safely and carefully to avoid damaging your work surface or injuring yourself. Thanks for reading!

Do you have any other questions about dead blow hammers or rubber mallets? Let us know in the comments below! And be sure to check out our other articles for more information on tools and home improvement. Happy hammering!

7 Best Hammers for Chisel

There are various kinds of hammers that can be used for wood chisels. If you are looking for the best hammers for your Chisels then this article is right for you. Carpenters use the chisel hammer to strike the end of the chisel wood handle during chopping the wood. They also use it to assemble the furniture. A smaller head hammer will hit more precisely on the COP (center of percussion) and you will get the most effective strike.

Normally, the chisel hammer is made from plastic, nylon, steel, brass, or wooden and it can be of different sizes and weights. Most of the case the chisel handle is made of wooden. So you have to choose the right hammer from the different sizes and weights hammer for your right work. Normally, a low weight and soft-faced hammer are good for the chisel. As per as possible avoid the heavier and the metal hammers. They can damage the chisel handle. The soft face and lighter weight hammer will less damage to the wood. To maximum control and get the most benefits hold your hammer at the end of the handle.

Wood is Good WD205 Mallet, 18-Ounce

  • This Wood is Good 18-Ounce Mallet is guaranteed unbreakable. The head is made of a tough urethane material designed to be quiet and yet able to transmit the maximum blow to the tool. Urethane head is 2-3/4-inch diameter.
  • The handle is beautifully turned out of selected New England hardwood and is polish sanded.
  • Made in the USA.
  • It’s light enough for delicate chisel work.
Best Hammers for Chisel

Shop Fox D2810 Brass Head Mallet, 12-Ounce

  • The mallet has a maple handle which is comfortable to hold.
  • The head is made of brass and connects to the handle with a threaded bolt.
  • The weight of the mallet is 12 ounces which are right for chisels.
  • Durable and Compact design
  • Affordable price
shop fox mallet

Estwing DFH 12 Rubber Mallet

  • Estwing DFH 12 Rubber Mallet is a double face hammer. The two faces are not the same type; the red face is comparatively soft than the yellow face.
  • The handle is designed to fit the grip of the user’s hand ensuring comfort & control. high quality, well made, and durable, the handle is what shines for me.
  • The weight of the mallet is 12 ounces which are right for chisels.
  • Made: It is made of USA
estwing dfh 12

Estwing Dead Blow Hammer – CCD45

  • The Estwing dead blow hammer has a polyurethane construction. It is extremely durable and designed not to damage wood and other softer materials.
  • Multi-Use Mallet
  • Oil and Chemical Resistant
  • Comfortable, durable vinyl grip for a strong hold in all conditions
  • Made in the United States
estwing dead blow hammer

Amazon Basics Rubber Mallet

  • Solid rubber head delivers softened positive blows for shaping and blunt strikes
  • Contoured fiberglass handle provides a comfortable grip
  • 450 gram rubber mallet for comfortable a wide variety of uses
  • Country of Origin: ‎China
  • Backed by an Amazon Basics 1-year limited warranty
Amazon Basics Rubber Mallet

KAKURI Chisel Hammer 375g

  • It is a high-quality Japanese hammer ideal for adjusting planes, chiseling, and nailing.
  • DOUBLE FACED HEAD: A dual head supports your woodworking. One side is flat, and the other is slightly domed. It is made of quality Japanese carbon steel.
  • A Japanese heavy-duty hammer. The handle and head are wedged.
  • The wooden handle is made of natural Japanese oak wood that fits comfortably in your hand.
  • Made in Japan
Kakuri chisel hammer

Estwing Sure Strike Drilling/Crack Hammer

  • The heavy-duty forged steelhead of Estwing Drilling/Crack Hammer provides maximum strength and durability for a lifetime of hard work. Both faces are fully polished.
  • The handle is made of fiberglass which is lightweight, durable, and offers a comfortable controlled swing with a ribbed grip to prevent slips.
  • Weight: the weight is 3 lbs (Pounds). Right for heavy-duty work.
  • Uses: Designed for striking cold chisels, brick chisels, punches, star drills, hardened nails, spikes and more.
  • It is made in the United States
estwing sure strike hammer

Here we explain the different types of hammers for your Wood Chisel. Choose your best hammer for chisel according to your woodwork, and chisel sizes. Never use the loosen hammer it will damage your work and also risk injures.

Carpenters pliers – pincers

There are various types of pliers available for specific functions. The pliers that are used in woodworking project are called carpenters pliers. Actually, it is known as carpenters pincers. It is one kind common and basic hand tools for carpenters. They use it to pull out nail or to hold wide range of object firmly. Normally it is made of steel alloys combination with other metals like vanadium or chromium. These metals improve strength of the pliers and prevent them from corrosion.

Parts of Carpenter pincers

The carpenter’s pincers have many parts such as jaw, cutting edge, pivot point and handles. Each of the parts has specific tasks. The functions of the parts are described as below:

carpenters pliers

Jaw

Carpenters pincers have broad range rounded jaws. It protects the wood during extracting nails or staples to damage. It also helps to pulling out the nails and staples.

Cutting edge

The cutting edge has beveled type and broad tip. It provides the pincers an extra cutting strength to grip when the carpenters want to cutting or pulling the nails. The edge of the good quality pincers will meet together without any gaps and provides plenty of cutting strength.

Pivot Point

Pivot point is the center point for moving the handle and jaws. Normally, it consists of a nut or screw. Some has two pivot points. The first pivot point acts as a lever on the second one, magnifying the force applied to the jaws for the same amount of effort.

Handles

The handles act as levers to force the jaws. Normally, the most part of the handle are covered with plastic or rubber for comfort and for good looking. The carpenter’s pincers consists of two handle. When the force applied on the handle, they moves in opposite directions, around a center pivot and comes together like scissors.

What are carpenters pliers used for?

The carpenters pincers are used for gripping and pull out nails or clevis pins from wood without damaging the wood work piece surface. It has wide rounded jaws; therefore it would not dig into the wood. It is also useful for repairing windows and doors, removing skirting boards and renovating furniture. Some pincers are design with hammerhead to striking the nails. Moreover, it is also used for cutting nails, wire or staples.
carpenters pincers

Difference between End cutting and carpenters pincers

The main difference between the End cutting and carpenters pincers are cutting edges, jaw size and handle length. The end cutting pincers have very sharp cutting edges compare to carpenters pincers. Therefore it can easily cut nails and bolts, so it is used for cutting while carpenter pincers are used for pulling nails. Most of the end cutting pincers sizes are 150mm to 200mm whereas the carpenters pincers can up to 300 mm. On the other hand the width of the head can be 20mm-30mm. The end cutting pincers may have return spring to reduce the effort for repetitive task. End cutting pincers, also known as end cutters, nippers or end cutting pliers.

Conclusion

Always choose right carpenters pliers for your woodwork, so that they fit well. You should not use the pincers for thicker objects that the sizes are projected. Never use them as a hammer. Otherwise they will be damage.

Types of woodworking screwdrivers and their uses

Screwdriver is one of the important hand tools for different woodworking project. It is used to drive or loosen screw into the wood. A woodworking screwdriver has some basic parts like handle, shank, blade, and tip. It has many variations but two basic types of screwdrivers such as flathead screwdriver and Philips type screwdriver are most popular. Always try to use exact screwdriver for driving or loosening a screw. Otherwise it can damage the screw or the tip of the screwdriver or woodworkpieces. You should keep in mind, all the time use flat head screwdriver for flathead screw and Philips screwdriver for Philips screws. Sometimes you may needs long blade for a lot of torque. You may also need a small or medium flat screwdriver so that they can reach easily in work place. At starting, use minimal force on to the screw. Although all most all the screwdrivers are handheld, few of them are electric. It is also used in many maintenance works like mechanical, electrical, jewelry work etc.
Types of woodworking screwdrivers and their uses

Parts of a screwdriver

A traditional Screwdriver has four basic parts; Handle, shank, blade and tip.
Parts of a screwdriver

Handle

The handle is cylindrical and widest part of the screwdriver. It is used for griping during work time. Normally it is made of hard and durable plastic, wood or metal. The handle should be comfortable so that people can feel comfort during maximum torque.

Shank

The shank is thinner than handle. Normally it is made of hard steel. It attached to the handle and the blade. It can be long, medium or short. The long shank will provide more torque than a short shank.

Blade

The blade can be seen in flat head screwdriver.

Tip

The tip is the end of the blade or shank. Actually the classification of the screwdriver depends on this part of the screwdriver. Normally it is made of steel. When you use a screwdriver always try to use exact matching tip; never use a wider or narrow tip. If we use a wider or narrow tip, then it may damage the surface of the workpiece or screw or tip. The tip may be magnetic to easily grab on to the screw. Some of the screwdriver has detachable tip; in this case it is known as bit. Normally it is shown in a set of screwdriver where contains one holder and several bits.

Types of woodworking screwdriver

There are various types of screwdriver that are used in woodworking. Actually they are classified according to their shape and sizes. They are made for different types of driving surface like slot, grooves etc. of screws. Among them flathead and Philips type screwdriver are popular. Besides these two basic types of woodworking screwdriver, some of other screwdrivers such as square head screwdriver are also used in woodworking.

Flat head screwdriver

Flathead screwdriver is very simple and most common; hence it is also known as regular screwdriver. It is fits to the single slot screw. From earliest time, it is the most common and basic types of screwdriver. The flat head screwdrivers are two categories; flared and parallel types. The flared screwdriver has slightly wider edge tip compare to their shank. On the other hand the edge of the parallel screwdriver is same width as the shank.


Flat head screwdriver

Philips screwdriver

The Philips screw driver contains a cross or a four star point, hence they are known as cross screwdriver. You can apply more force or torque with these screwdriver compare to the flathead screwdriver. These types of woodworking screwdriver have less possibility to slip out. So they can damage on the head of the screw and the workpieces very low. To avoid damages, you should choose the exact screwdriver. Henry F. Philips designs this screwdriver and the screw in 1930s; this is why the name is Philips screwdriver. They can be small, medium or large. Further some screwdriver such as Pozidriv, Frearson, Supadriv looks almost similar to this but they are slightly deference. Pozidriv can provide more torque then Philips type screwdriver but their design is very complex. You can use flathead screwdriver instead of it but not with Robertson screw.


Philips screwdriver

Frearson Screwdriver

Frearson screwdriver also has cross slot as like Philips screwdriver. But it is slightly difference; The Philips slot looks like U-shaped whereas frearson slot looks like V-shaped. Moreover, the screw slot of it is deeper then Philips screw. It is also known as Reed and Prince.

Square screwdriver

The square head screwdriver is not tapered and has very sharp corner whereas Robertson is slightly tapered and round corner. If you use square screwdriver in a Robertson screw oppositely use a Robertson screwdriver in a square screw, then it can damage the screw or driver. You will get huge torque and driving force. Today it is not a popular screwdriver.
Square screwdriver

Robertson screwdriver

Robertson is almost same as square screwdriver. Some people know them as square head screwdriver. The Robertson screwdriver’s tip has slightly taper and slightly rounded corners. The tapered socket tends to retain the screw, so it is easy to use. Normally, the USA Companies are manufacturing square type screwdriver. Robertson are popular in Canada. It reduces damage of the screw or workpiece. The all four side of the square head grip strongly and apply better torque.

Robertson screwdriver

Torx head screwdriver

Torx look like star screw but it has six point head. So it will get a lot of surface area in touch to the screw. It reduces slip out. The Torx apply more torque then Philips screwdriver. Normally it is used mostly in electric, automobiles, motorcycles, computer etc.

Offset screwdriver

Offset screwdriver is special types of screwdriver with the blade at right angles. It is used where a straight screwdriver cannot reach or too difficult to reach. It is come with combination of flathead or Philips head tip. It may contains magnetic tips or ratchet mechanism.

Offset screwdriver

Ratchet screwdriver

Ratchet screwdriver is also special types of screwdriver. It has a lock and unlocks system. When you rotate the handle clockwise, then it will lock and works i.e. it tighten the screw. On the other hand, when you rotate the handle to the counter clockwise, then it will unlock (freely rotate) and does not works. A ratchet screwdriver is used greatly where needs to apply same torque. It can be flat headed or Philips headed. The can also come with a ratchet bit holder and several different types of bit.


Ratchet screwdriver

Conclusion

Some woodworking project cannot do without screwdriver. You do not need all types of woodworking screwdriver in your toolbox. You should consider what types of work you are doing regularly. To get benefits and for quality work, you should make sure about using the right types of screwdriver for your work. Do not use hammer for strike on the screwdriver or screw.

Woodworking clamps

Woodworking clamps work as strap. There are so many types of clamps that are used to place objects tightly together in carpentry works. The common joiner or carpenters clamps are bar clamps, pipe clamps, c clamps, spring clams, hand screw, Band clamps, Miter clamps etc. The clamps come in many different style sizes. One clamp cannot perform so many works. Therefore a carpenter may needs more clamps but not too many. Here we peek some essential clamps for woodworking projects.
woodworking clamps

1. Woodworking bar clamps

Bar clamps are especially used for carpentry works to hold pieces of wood together for flagging, gluing, nailing and cutting. A carpenter can use these woodworking clamps easily and quickly. They can be divided for light duty, moderate duty or heavy duty. The common woodworking bar clamps are parallel bar clamps, f clamps, one handed bar clamps, Deep throat bar clamps etc. They contain a bar which is looking as like I-beam. They are great for accurate clamping pressure.

Parallel bar clamps

Parallel bar clamp is one of the significant clamps for woodworking. It has two rectangular jaws. One of them is fixed whereas the rest one is movable. They provide strong clamping force to the accurate directions which makes easier alignments. Reasons the jaws remain parallel. Some parallel bar clamps have configuration so that they can use as a spreader. They are available in various lengths.
Parallel bar clamps

F clamps

F clamps is one kind of bar clamps which is suitable for a wide range of woodworking projects. It is designed with a slider bar which provides large opening capacity. Besides slider bar it also has two parallel bar and an adjustable screw. One of the parallel bars is fixed while another is moving. The adjustable screw is used for tightened. As the slider bar is smooth, it should be free from oil, graze etc. The name comes from that it looks like the letter ‘F’.
F clamps

Deep throat bar clamp

Deep throat bar clamps is suitable for the work where extra deep reach is required home repair. They are very useful for high pressure application and wide opening capacity. They have versatile uses, so it will be great to keep in joiner’s collection with other carpenters clamps. These woodworking bar clamps are available in different depth from 6 inches to 79 inches.
Deep throat bar clamps

One handed bar clamps

One handed bar clamps has two jaw. One of them is movable and other is fixed. The movable jaw contains a trigger grip handle and a release lever. When the trigger grip handle is press then the movable jaw go forward to the fixed jaw and give pressure to the work piece. While the work is complete then the joiners just have to press the release lever to open the clamp. It is so easy that a joiner needs only one hand so other hand is free for holding another position of the work. One handed bar clamps has also a spreader function. For this the fixed jaw has to set another end of the bar. This facility can be used many woodworking project like cabinet, chair or tables making project. The available sizes are from 6 inches to 60 inches.


2. Hand screw woodworking clamps

The hand screw clamps are extremely versatile and wonderful tools. It consists of a pair of jaws, pair of handles, and pair of screws. Two handles are connected with screws. The screws are design with right-hand and left-hand threaded that run through both jaws and connected them. They are adjustable and control the movement of the jaws. You can easily clamp tapered, angle or offset of a workpieces. Normally the jaws are made of wood.

3. C Clamp

Each carpenter starts their clamp collection with a few c clamps. It has two parts; frame and threaded screw with Tommy bar. The name comes from the frame shape which looks like the letter ‘C’. At the top of the frame has small flat edge whereas at the bottom has a threaded hole for holds threaded screw. On the other hand the frame side end of the screw contains a flat edge while the other ends contains tommy bar. These woodworking clamps made of cast iron or steel. Sometimes it is also refers as G-clamps or carriage clamp. It is an essential tool for joiners. They come in different sizes which also indicate the clamping capacity. It provides a massive amount of pressure into a small region. Therefore some project needs to use a piece of wood between the clamp edge and the surface of the workpiece to distribute the clamping pressure.

4. Pipe Clamps

The pipe clamps are composed of two heads, pipe, adjustable screw and handle. One of the heads or jaws is fixed whereas the other is moveable. The movable screw is control by adjustable screw with handle. They look like a bar clamp. The main difference between them is that it has a sliding pipe instead of sliding bar. So it has a long opening capacity which is related to the length of pipe size. It is less expensive then bar clamps but comparatively shorter length pipe clamps are expensive. They are various sizes and diameters such as 3/4˝ diameter pipe and 1/2˝diameter pipe.

5. Spring Clamp

Spring clamps looks like clothes clip. It has two jaws with two handles which are joined together by a spring. It is a small kind of carpenter’s clamps and has a limited opening capacity. They are available in different sizes and styles. They are perfect for use in many woodworking projects like gluing and domestic tasks. Spring clamps are also known as hand clamps or pinch clamps. Some of them contain adjustable jaw.

6. Band Clamp

Band clamps are used for clamping round, square, oval, hexagonal, rectangular or other bend shape workpieces. They may contain flexible strap, and ratcheting mechanism or open end wrench mechanism. Mainly two type band clamps are available; ratcheting band clamp and non-ratcheting band clamp. Ratcheting mechanism band clamp has very easy tightened and release system but the non-ratcheting mechanism is very frustrating system. To secure workpieces the applying pressure should be simultaneous to all the directions. These woodworking clamps are cheap and provide light pressure.

7. Miter Clamp

Miter clamps are used for assembling miter joints. This tool set may contain a pliers and clamps. When the miter joints are gluing, it needs pressure to keep wood pieces together; miter clamps are perfect for keeping pressure on gluing miters. The clamp has two sharpen point. They can be spread up to 2 inches. A joiner can applied and remove them with their hand but it may not be in accurate places. On the other hand they can place it more accurately, easily and safely with pliers.

Without the above woodworking clamps, occasionally the carpenters may have to use masking tape, electric tape etc as clamp.

Conclusion

The woodworking skills of the joiners will be improved, if they use different woodworking clamps in their projects. Always select proper clamps for the project and wear safety equipment. After using some carpenters clamps, it may mark on the work, so in these case try to use pad to avoid marking. Do not use any spoil clamps. Always collect adequate number of clamps so that you can use exact clamps.

Woodworking hammer

Woodworking hammer is equipment that used to create sudden impact force to drive or remove nails, fits parts, forge metal and breaking up objects. Most of them are hand tools but few of them are power tools. It comes in different sizes, shape and types depends on their functions. Different trades have a special basic tool for different uses. Usually all the hammers contain two main parts – head and handle. The head is perpendicular to the axis of handle. There are so many types of hammer but here we only discuss the carpenter hammers that are used in different woodworking project.
Woodworking hammer

Claw Hammer

Claw Hammer is one of the basic tools for woodworking. It is used to drive the nail or pull the nails and some other works. It has two parts – head and handle. The head has two sides – one side is flat whereas other side has a ‘V’ shape with curved for removing nails from wood or other work piece. The head is made of steel and the handle is made of wood like hickory, fiberglass or steel. If the fiberglass or steel handle is used then it may use rubber or plastic or vinyl grip for control and comfort. The claw hammers are available in different sizes and weights such as 455-680gm. It is also known as carpenter hammer.
Claw Hammer

Framing Hammer

Farming hammer contains a longer handle and heavier than claw hammers. It is used to driving or removing large nails and doing carpentry work.

Ball peen hammer

Ball peen hammer contains one flat end and one round end on their head. Normally they are often used for hammering and shaping metal. They are also used to drive punches and cold chisels. The size and weight of them are as similar as claw hammers but their uses are not as versatile as the claw hammers. It is not essential for a woodworker. Generally the head is made of hard steel and the handle is made of wood or Hickory. They are also known as ball pien hammer, engineers or mechanics hammers. The common weights are from 110g to 165 gm but they can be range from 55 – 1100g.
Ball peen hammer

Cross pein hammer

This woodworking hammer has two sides in head where one of the sides is flat as like ball peen hammer but other side is different which looks tapered. They are used for driving small nails; straighten the deformed nails, shaping metal or light joinery work. They come in two different designs – English and France/German.
Cross pein hammer

Mallet hammer

Mallets are used in woodworking project to reduce damage to whatever we are hitting. They are made of soft materials such as wood, plastic, rubber. They have a board face which can be removable or fixed. Both of them have advantage and disadvantages. The removable face is replaceable which make it cheaper. On the other hand fixed face mallets have bouncing problems. To solve this problem a newer version mallets are come in which is known as dead blow hammer. It has a hollow head filled with lead or steel shot to reduce bounce. They are used for beating joint together, driving chisels, forming sheet metal, working on soft metals, and knock in dowels but not suitable for driving nails. It is a fundamental tool for a joinery work.
Mallet hammer

Soft faced hammer

The end faces of these woodworking hammers are made of soft materials like rubber, wood, plastic etc. It is the smaller version of the mallet hammer. It is used those cases where steel will possibly damage the work piece.

Lathe hammer

A lathe hammer head contains a smaller cutting blade and pulling nails in one end whereas the other end has a hammer head. It is used for cutting and nailing wood lath. It is also known as a lath hammer, lathing hammer, or lathing hatchet.

Knife edged hammer

This carpenter hammer looks like an axe because it has a knife edge in one end whereas the other end is flat surface. The carpenter use this woodworking hammer for cut or split wood.

Roofers and Slaters Hammer

This hammer has a spike at one side whereas the other end has a plane face. It is used for putting nail hole in slates and knocking the nails.

Non Woodworking hammer

Without these, there are many others hammers are available like Lump hammer or club hammer, Sledge hammers, Blacksmith hammer, Bricklayer hammer, Brass hammer, Cow hammer, Drilling hammer, Geologist’s hammer. But they are actually made for specific type of work which is given as follow:

Hammers Used for
Lump hammer or club hammer hitting cold chisels to break masonry in building site
Sledge hammers breaking up masonry, stones and concrete, knock rigid assemblies
Engineering / Drilling Hammer locomotive and steam engine work
Blacksmith’s Hammer shaping steel
Welder’s hammer remove waste material from round a weld
Blocking Hammers shaping metal on a block or anvil
Geologist Pick Hammers breaking up rocks
Planishing Hammer metal working
Scaling Hammers removing scale in industries like boiler
Brick & Mortar Hammers breaking bricks
Bricklayer’s / Tilesetter’s Hammer cutting brick or tile
Drywall Hammers cutting plasterboard for pipes
Chasing Hammer designed and shape metal jewelry
Toolmaker’s Hammer delicate work in the machine shop
Railroad-spike maul Hammer driving a railroad spike
bushing hammer allows stone and concrete to be textured
Scutch Hammer construction industry

Awareness using carpenter hammer

  • Always use the exact hammer for the work to avoid possible damage to the work piece and makes the work easier.
  • To get most benefits, grip at the end of the handle.
  • Always avoid loose head, damage handle or chip face.
  • To prevent probable damage of a work piece, use a piece of wood before hitting on a work piece.
  • Do not use the side for hitting purpose; use the head of the hammer. It would possibly damage the hammer.
  • Sometimes you have to rough the face with abrasive paper because after long time work the face can become polished.

Both the weight and handle type are the important factor for choosing a woodworking hammer. They have a relationship with comfort. The longer handle will help to get the full speed of the hammer but too long hand will delivers force to the wrong place. On the other hand a short handle will not deliver enough force.

Woodworking marking tools

Marking is a vital point in woodworking project. The most common woodworking marking tools are pencil, gauge, scriber, marking knives, awl etc. They are used for doing anything such as cutting, shaping, drilling to a piece of wood. You can draw a parallel line to the edges, jig jag line or rounds of a workpiece with them.

Pencils

Pencils are essential marking tool to woodworkers. They have some limitations; for example they cannot mark a sharp line and the mark may be rubbed out. But they have some benefits such as you can easily mark a line. The pencils are great for those cases where accuracy is not important. Most of the cabinet makers use pencil for marking.

Scriber marking tool

In woodworking project a scriber which is a hand tool is used to mark lines on workpieces. This tool is used for marking wood by scratching on the surface to cutting with precision. The lines with the scriber marking tool is more accurate and sharp then the pencils or ink. Often they are used for making mortise, tenon joints, door casings etc. They are made of steel and have a sharpened point which is angle of 30 or 40 degrees. Some scribers may contain a point at both ends.
Scriber marking tool

Scratch awl

The scratch awl looks like a spike which contains a tip. It is used as a point marking tool in woodworking project. It scribes a line across the timber so that a hand saw or chisel can be run properly.

Gauge

The marking gauge is a significant tool among the woodworking marking tools. There are several types of gauge are used for cutting or other operations in woodworking project. Among them the marking gauge, mortise gauge and the cutting gauge are most popular gauges on the market. They scribe a parallel line to a reference edge or surface. The gauge contains a stem/beam, headstock, screw and a scribing point tool such as pin, knife or wheel. The headstock is adjustable and the distance between the pin and headstock can increase or decrease by loosening the thumbscrew. They are more accurate marking tools than the pen or pencil.

Marking gauge

It is a most common type gauge as well as woodworking marking tools. It has a small pin which is also known as spur. The other parts of these tools are stem, stock and adjustable screw. During marking you should run the tools in line with the wood grain. If you run a line against the grain then it would possible to produce inaccurate jig jag line. Normally joiners use this tool for scribing tenons and dovetail shoulder lines. Moreover, sometimes it is also used for marking a rabbet. The stem lengths are available from 9 inches to 10.2 inches. Much larger marking gauges are known as panel gauges.

Mortise gauge

A mortise gauge has two pins where one of them is adjustable relative to each other. It is able to scribble two lines simultaneously including different widths. Normally it is used in mortise and tenon joinery project. Sometimes this gauge may contains a third pin on the opposite side so that it can be used a regular marking gauge. Therefore it is also known as combination gauge. These gauges are available in different stem length from 6 inches to 11.5 inches.
Woodworking marking tools

Cutting gauge

The marking gauge with a knife instead of a pin is known as cutting gauge. It is able to mark wood against the grain with accuracy. It can cut clean and precise deep lines in the timber. You can also use this gauge to cut through thin materials like veneer.

Wheel gauges

Wheel gauge contains a round blade instead of a pin to mark a surface. As like cutting gauge it can also mark across the wood grain. For mark out mortises the wheel gauge may also contains two round blades. Then it is known as wheel mortise gauge. The round blade contains in two separate stems. As a result they can be adjusted according to each other.

Panel gauges

The marking gauge which has a longer stem is called panel gauge. The carpenters use these tools to mark large boards to the correct width; even in center of a board. The stem length can be 12 inches to 26 inches.

Marking Knife

Joiners use marking knife to scribe a line so that they can accurately run a hand saw or chisel during making joints or other operations. It is constructed with steel blade and wood or plastic handle. They can able to mark across the grain and the line is accurate than pencils.

Others Woodworking marking tools

Some tools are not directly used as scribing but they are also known as woodworking marking tools. They are used as a guide of above marking tools. Try square, miter square, steel rule, t-bevel are such type of tools; actually they are known as measuring tools. Joiners use the try square to mark out a line at right angles to an edge. Steel rules can be used with marking knife or pencils. They are available in different lengths. Miter square is used to mark at any angles.

Wood boring tools and their uses

Wood Boring tool is one kind of cutting tool. A joiner uses these tools for holes during making or repairing furniture. The common boring tools are braces, bits, gimlet etc. Joiners can also use different chisels for boring work. The hand boring tools get power from the hand pressure whereas electric power dill get power from electricity and battery. Always try to keep sharp of your cutting parts for great result.

Boring drill bit

Boring drill bits are cutting tools that are used to create cylindrical holes. The joiners use these bits with hand brace, hand drill or electric power drills. Following are the different types of bits.

Auger bit

An auger bit contains a helical screw blade for boring holes. They have sizes from 1/4 inch to 1 inch. They are long than others bits. So they can able to bore deep holes which are very smooth. The screw blade can also act as conveyor to remove shavings from the hole. Different types and designs auger bits are available for boring holes.

Expansion bit

Expansion bit is not an indispensable tool. Sometime a joiner has to bore a larger hole as like door hole. They use expansion bit for this purpose. The bit can able to cut over 1 inch holes. It has an adjustable scale, so that you can able to cut the hole as you needed. This bit also has a tang to fit into the hand brace.
Expansion bit

Twist bit

The twist bits are inexpensive and extremely available. You can holes from 1/16 to ½ inch. They work best at higher speeds. They have a single or double spiral, two cutting edges and two spurs.

Spade bit

Spade bit - wood boring tool
The spade bit has a flat blade which is inexpensive and works very fine. The can hole from 1⁄2″ up to 1 1⁄2” in diameter. Comparatively they can bore quickly but it is not well finest.

Brad point bit

Brad point bits have somewhat similarities to twist bits. It contains a center extended point and a pair of cutting spurs. Joiners like to use these tools for exact drilling like for dowel holes. It bore a very clean hole.

Forstner bit

Forstner bit has a small center point. But this point does not guide the bit. The outer rim guides the bit to cut holes. Therefore carpenters can able to cut curve hole on a workpiece. The drawback of these bits are that if you use handheld drill then the center point may displace at the beginning time of the work from its original point. On the other hand it bore cleanest hole and ideal for overlapping boring. These boring dill bits are costly but it has some powerful qualities which make them indispensible for some woodwork. With these tools a joiner can bore a hole from ¼ ̋ to 2 ̋ sizes. For better result you should use moderate speed.

Center bit

Center bits are used as guider of the next drill bits for producing center holes in a workpiece. They ensure a hole to the right place. It is important for those cases where precision and accuracy are required. For these purposes first use the center bit then follow up with conventional drills. If these bits are used at starting time then the next drill bit does not walking. Moreover it is also used in those cases where joiners want to drill a small sizes hole into a big sizes hole. In addition joiners also use the center bits to make a conical indentation in the end of a workpiece.If you want to know more about “how to center a drill bit” then you can see this video.
center bit

Countersink bit

Countersink bit is used to cut a conical hole so that it can allow the head of a bolt or screw. During working time a joiner first bore for the screw than cut the conical hole. This bits are available in six several sizes which are 60°, 82°, 90°, 100°, 110°, or 120°. Among them 82° and 90° Countersinks are most common wood boring tool.

Cobra bit
Cobra bit is used those narrow spaces where do not have operational working environment. Joiners can use this bit as a electric screwdriver. Related video
Cobra bit

Hole saw
A hole saw is a steel cylinder with saw teeth for cutting holes. It does not cut so quickly. It is inexpensive and very available in the market. The hole saw is also known as a hole cutter. They are used for large hole up to 6 inches.

bradawl tool

It is very simple tool. Woodworkers use this bradawl tool for boring small and shallow holes. It is vital for boring holes for small to medium sizes screws.
bradawl

Drills

Drills are the wood boring tools. They are two types which are electric drill and hand drill. The hand drills are useful where the electric drills are not available. Generally they bore the holes sizes from 1mm to 9mm.
Hand-drill and power drill

Woodworking brace tool

The Brace, which is a hand tool, is used for boring hole. It consist head, cranked handle, chuck and frame. Some braces may contain ratchet, which is placed just behind chuck. These wood boring tools are ‘U’ shaped. It generates more torque than a hand drill. They are ideal for use with larger bits like auger bits, forstner bits, countersink bits etc.
woodworking brace tool